Signalling between QML and the C++ back-end
Now we know how the signals and slots are used in the Qt programming domain. Next step is to connect the QML front-end to the C++ back-end so that we can do our heavy number crunching in the C++ side.
The communication should be bidirectional so that we can pass data from the QML side to the C++ back-end and vice versa.
In the C++ classes we can add slots and signals as described in my previous post. If we create a context property for each object we can then access the slots and signals from the QML elements.
Let’s create a simple counter application with a QML user interface. The application structure is depicted in the figure below. In the C++ side we will create one simple class (MyClass) that contains 3 slots (setValue, increment, decrement) and one signal (valueChanged). In the QML side we will add 3 buttons that will call the slot methods when clicked. In addition we will add one label that will display the counter value (stored in the myValue variable in the MyClass object).
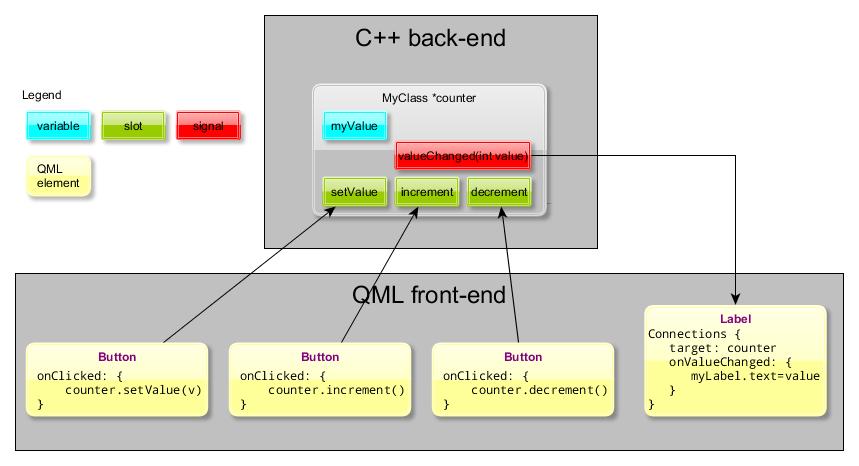
Here is the MyClass declaration (in myclass.h). Note that the signal valueChanged has one named argument (int value). If we want to pass some data with the emitted signal to the QML side then we must name the argument in the signal prototype declaration (this was not needed when connecting to another C++ class instance). In the QML element we must refer to this argument name when reading the data from the signal.
#include <QObject>

class MyClass : public QObject
{
    Q_OBJECT
public:
    MyClass();

signals:
    void valueChanged(int value);

public slots:
    void setValue(int v);
    void increment();
    void decrement();

private:
    int myValue;
};

#endif // MYCLASS_H
The MyClass implementation (myclass.cpp) is shown below. Here we will just define the slot methods (+ the class constructor). Each slot method will emit the valueChanged signal to display the counter value.
#include "myclass.h"

MyClass::MyClass()
{
    myValue = -1;
}

void MyClass::setValue(int v)
{
    if (v == myValue)
        return;
    myValue = v;
    emit valueChanged(myValue);
}

void MyClass::increment()
{
    emit valueChanged(++myValue);
}

void MyClass::decrement()
{
    emit valueChanged(--myValue);
}
The main program is pretty basic. We will instantiate MyClass and then add the object pointer (counter) to the root context (naming the property also to “counter”). Finally we will call the setValue method to initialize the counter to 0 (the constructor set the value to -1). This ensures that we will get the first signal emitted at this point and the display will be initialized, too.
#include <QtGui/QApplication>
#include <QtDeclarative/QDeclarativeContext>
#include "qmlapplicationviewer.h"
#include "myclass.h"

Q_DECL_EXPORT int main(int argc, char *argv[])
{
    QScopedPointer<QApplication> app(createApplication(argc, argv));
    MyClass *counter;

    QmlApplicationViewer viewer;

    counter = new MyClass;
    viewer.rootContext()->setContextProperty("counter",counter);

    viewer.setOrientation(QmlApplicationViewer::ScreenOrientationAuto);
    viewer.setMainQmlFile(QLatin1String("qml/TestApp9/main.qml"));
    viewer.showExpanded();

    counter->setValue(0);
    return app->exec();
}
Ok, next the QML code.
The main.qml file is just the normal template given by the Qt Quick Application project.
import QtQuick 1.1
import com.nokia.meego 1.0

PageStackWindow {
    id: appWindow

    initialPage: mainPage

    MainPage {
        id: mainPage
    }

    ToolBarLayout {
        id: commonTools
        visible: true
        ToolIcon {
            platformIconId: "toolbar-view-menu"
            anchors.right: (parent === undefined) ? undefined : parent.right
            onClicked: (myMenu.status === DialogStatus.Closed) ? myMenu.open() : myMenu.close()
        }
    }

    Menu {
        id: myMenu
        visualParent: pageStack
        MenuLayout {
            MenuItem { text: qsTr("Sample menu item") }
        }
    }
}
The MainPage.qml file contains the buttons and labels (and a gradient background rectangle copied from my earlier project). The label named MyLabel will display the counter value. To connect to the valueChanged signal we need to add a Connections block to the label definition. The Connections block needs two properties:
- target = the signal source object (the context property “counter” in this case).
- event name = on<SignalName> (“onValueChanged” in this case).
Note that we must capitalize the first letter of the signal name when adding the “on” prefix. And also note that we can refer to the signal parameter by using the formal parameter name (“value”) defined in the signal prototype in myclass.h.
import QtQuick 1.1
import com.nokia.meego 1.0

Page {
    tools: commonTools
    Rectangle {
        id: wallpaper
        gradient: Gradient {
            GradientStop {
                position: 0.000
                color: "gainsboro"
            }
            GradientStop {
                position: 1.000
                color: "slategray"
            }
        }
        anchors.fill: parent
    }
    Label {
        color: "white"
        font.pixelSize: 46
        text : "TestApp9"
        anchors.top: parent.top
    }
    Rectangle {
        id: myRectangle
        color: "slategray"
        width: parent.width
        height: 100
        anchors.centerIn: parent
    }
    Label {
        id: myLabel
        color: "red"
        font.pixelSize: 92
        text : ""
        anchors.centerIn: myRectangle
        Connections {
            target: counter
            onValueChanged: {
                myLabel.text = value; // signal formal parameter name
            }
        }
    }
    Button{
        id: resetButton
        anchors.horizontalCenter: parent.horizontalCenter
        y: parent.height*3/4
        text: qsTr("Reset")
        onClicked: {
            counter.setValue(0)
        }
    }
    Button{
        id: incrementButton
        anchors.horizontalCenter: parent.horizontalCenter
        y: parent.height*5/8
        text: qsTr("Increment")
        onClicked: {
            counter.increment()
        }
    }
    Button{
        id: decrementButton
        anchors.horizontalCenter: parent.horizontalCenter
        y: parent.height*7/8
        text: qsTr("Decrement")
        onClicked: {
            counter.decrement()
        }
    }
}
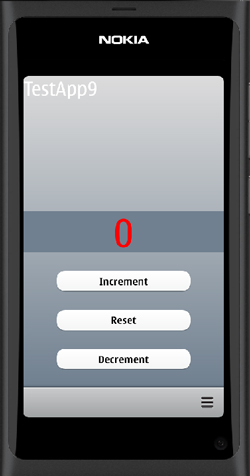
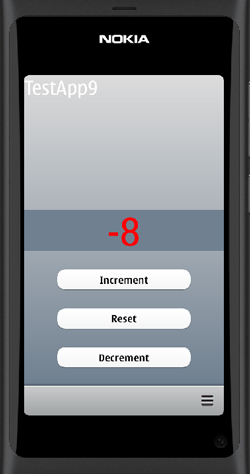
Let’s compile and run the application. The counter will start at zero. By clicking the “Increment” and “Decrement” buttons the counter value can be changed. By clicking the “Reset” button the value will be set back to zero.

The project is available for download from:
https://github.com/n9dyfi/TestApp9.git