Signalling between QML and the C++ back-end revisited
In the post Signalling between QML and the C++ back-end I described one method to pass information between the QML and C++ domains. The method was based on using the context properties. The C++ counter object was inserted into the root context and all the class methods became then callable in the QML side. Another method to pass information is to directly connect slots and signals. No context properties are needed in this case.
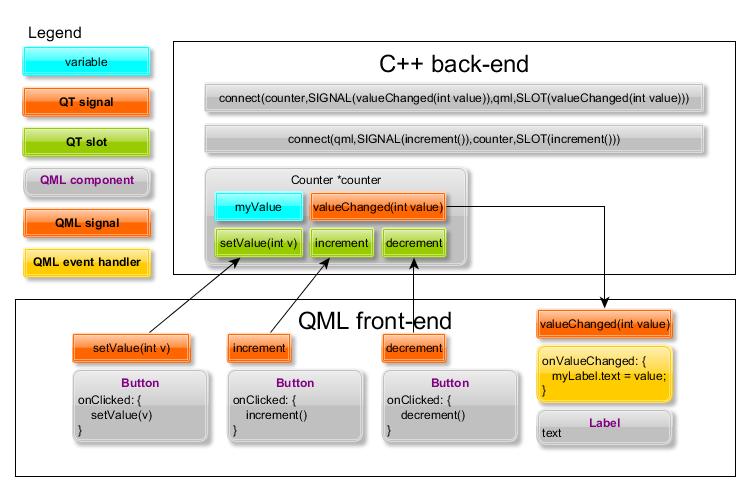
The figure below shows how the counter object is connected to the QML front-end. The counter class can be used as such, no changes are required. In the main function the context property will be replaced with a set of connect statements.
In the QML side we need to introduce a set of signals that can be used in the connect statements and that can be emitted from the QML element event handlers (or can be used to create an event handler for receiving a counter signal).
Let’s start from the main.cpp function. First we need to include the QDeclarativeItem header file. Then we need to introduce a pointer to the QML root object, let’s call it qml. Then we can call the QObject::connect method to connect the QML signals to the corresponding counter slots. And finally connect the counter signal to a QML slot (a QML signal is needed here, too).
#include <QtGui/QApplication>
#include <QDeclarativeItem>
#include "qmlapplicationviewer.h"
#include "counter.h"

Q_DECL_EXPORT int main(int argc, char *argv[])
{
    QScopedPointer<QApplication> app(createApplication(argc, argv));
    Counter *counter;

    QmlApplicationViewer viewer;
    counter = new Counter;

    viewer.setOrientation(QmlApplicationViewer::ScreenOrientationAuto);
    viewer.setMainQmlFile(QLatin1String("qml/TestApp12/main.qml"));
    viewer.showExpanded();

    // get the QML root object for signal-slot connections
    QObject *qml = viewer.rootObject();

    // connect QML signals to counter slots
    QObject::connect(qml,SIGNAL(setValue(int)),counter,SLOT(setValue(int)));
    QObject::connect(qml,SIGNAL(increment()),counter,SLOT(increment()));
    QObject::connect(qml,SIGNAL(decrement()),counter,SLOT(decrement()));
    // connect counter signals to QML slots
    QObject::connect(counter,SIGNAL(valueChanged(int)),qml,SLOT(valueChanged(int)));

    counter->setValue(0);
    return app->exec();
}
The counter header file (counter.h) is shown below. Three slots and one signal are declared.
#ifndef COUNTER_H
#define COUNTER_H
#include <QObject>
class Counter : public QObject
{
    Q_OBJECT
public:
    explicit Counter(QObject *parent = 0);
signals:
    void valueChanged(int value);
public slots:
    void setValue(int v);
    void increment();
    void decrement();
private:
    int myValue;
};
#endif // COUNTER_H
The counter implementation (counter.cpp) is shown below.
#include "counter.h"
Counter::Counter(QObject *parent) :
    QObject(parent)
{
    myValue = -1;
}
void Counter::setValue(int v)
{
    if (v == myValue)
        return;
    myValue = v;
    emit valueChanged(myValue);
}
void Counter::increment()
{
    emit valueChanged(++myValue);
}
void Counter::decrement()
{
    emit valueChanged(--myValue);
}
The main.qml file needs to be updated to declare the needed signals. Note that the event handler onValueChanged will be called when we connect a C++ signal to the QML signal valueChanged (and emit the C++ signal). Because the QML Label element that is used to display the counter value is instantiated in the MainPage.qml file we also need to create one property alias (the connect method expects that all the QML signals are declared in the main.qml file). The QML element properties in the child pages are not directly visible in the parent page (PageStackWindow in main.qml) but we can make them visible using the property aliases.
import QtQuick 1.1
import com.nokia.meego 1.0

PageStackWindow {
    id: appWindow

    // slot that can be connected to C++ signal
    signal valueChanged(int value);

    // signals that can be connected to C++ slots
    signal setValue(int value);
    signal increment();
    signal decrement();

    property alias counterValue: mainPage.counterValue

    initialPage: mainPage

    MainPage {
        id: mainPage
    }

    onValueChanged: {
        counterValue = value;
    }

    ToolBarLayout {
        id: commonTools
        visible: true
        ToolIcon {
            platformIconId: "toolbar-view-menu"
            anchors.right: (parent === undefined) ? undefined : parent.right
            onClicked: (myMenu.status === DialogStatus.Closed) ? myMenu.open() : myMenu.close()
        }
    }

    Menu {
        id: myMenu
        visualParent: pageStack
        MenuLayout {
            MenuItem { text: qsTr("Sample menu item") }
        }
    }
}
An alternative approach is to chain the QML signals. For that we would need to duplicate the valueChanged signal in the MainPage component and then connect the two signals in the main.qml file. The onValueChanged event handler could then be moved to the MainPage and it could refer directly to the myLabel.text property.
    Component.onCompleted: {
        valueChanged.connect(mainPage.valueChanged)
    }
Finally here is the MainPage.qml file. We define the property alias counterValue to access the myLabel.text. Inside the button event handlers we will call the QML signals (the top-level signals will be available in the child pages).
import QtQuick 1.1
import com.nokia.meego 1.0

Page {
    property alias counterValue: myLabel.text

    tools: commonTools

    Rectangle {
        id: wallpaper
        gradient: Gradient {
            GradientStop {
                position: 0.000
                color: "gainsboro"
            }
            GradientStop {
                position: 1.000
                color: "slategray"
            }
        }
        anchors.fill: parent
    }
    Label {
        color: "white"
        font.pixelSize: 46
        text : "TestApp12"
        anchors.top: parent.top
    }
    Rectangle {
        id: myRectangle
        color: "slategray"
        width: parent.width
        height: 100
        anchors.centerIn: parent
    }
    Label {
        id: myLabel
        color: "red"
        font.pixelSize: 92
        text : ""
        anchors.centerIn: myRectangle
    }

    Button{
        id: resetButton
        anchors.horizontalCenter: parent.horizontalCenter
        y: parent.height*3/4
        text: qsTr("Reset")
        onClicked: {
            setValue(0)
        }
    }
    Button{
        id: incrementButton
        anchors.horizontalCenter: parent.horizontalCenter
        y: parent.height*5/8
        text: qsTr("Increment")
        onClicked: {
            increment()
        }
    }
    Button{
        id: decrementButton
        anchors.horizontalCenter: parent.horizontalCenter
        y: parent.height*7/8
        text: qsTr("Decrement")
        onClicked: {
            decrement()
        }
    }
}
I’ll name the project TestApp12 and commit it to github. You can then open it in QtCreator by selecting File>New File or Project…>Project from Version Control>Git Repository Clone. The repository address is https://github.com/n9dyfi/TestApp12.git. As target select Qt Simulator and Harmattan. And finally click the play button.
