HexTool for Meego/Harmattan
HexTool is a Qt-widget based application originally written by Ryan Harkin in 2005 (see http://harkin.org/hextool/index.html). Basically it is a simple calculator and radix converter. You can convert 8, 16 or 32-bit numbers between different bases (binary, octal, decimal and hexadecimal) and perform simple logical and mathematical operations between the numbers.
In 2014 maemo.org user halftux published a version of the tool for N900 (see http://talk.maemo.org/showthread.php?t=93299). The tool looked interesting so I decided to try porting it to N9. At the same time I could maybe learn a bit more about the Qt Widget based UI design.
Eventually this porting exercise turned out to be pretty straightforward.
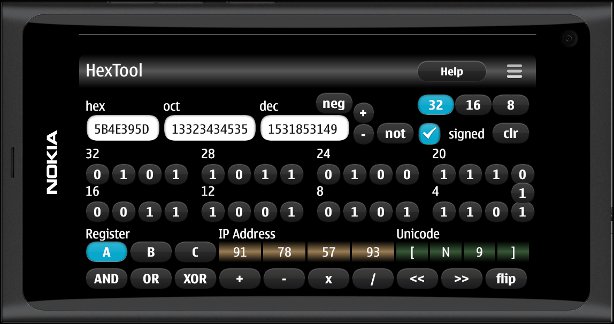
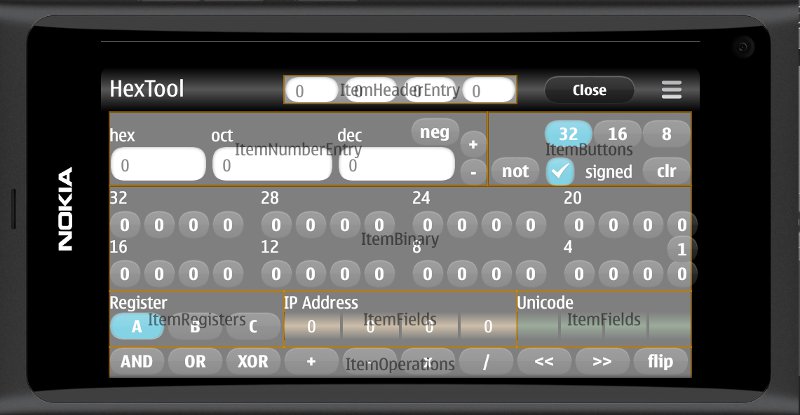
This is how the current N9 HexTool looks like.
Source code structure
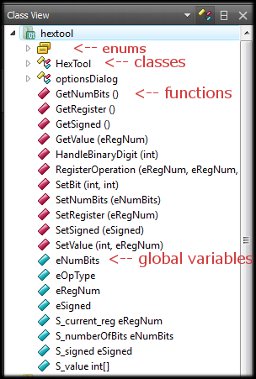
The QtCreator class view can be used to get a quick overview of the code structure. The hextool has two classes: HexTool and optionsDialog. The HexTool class contains the main functions used to control the user interface. The optionsDialog class is used for the options page. There are a set of global variables (+ enums) and a set of C-functions to process those variables. For the full list of symbols used in the class view please see https://wiki.qt.io/Qt_Creator_Class_View.
Program flow
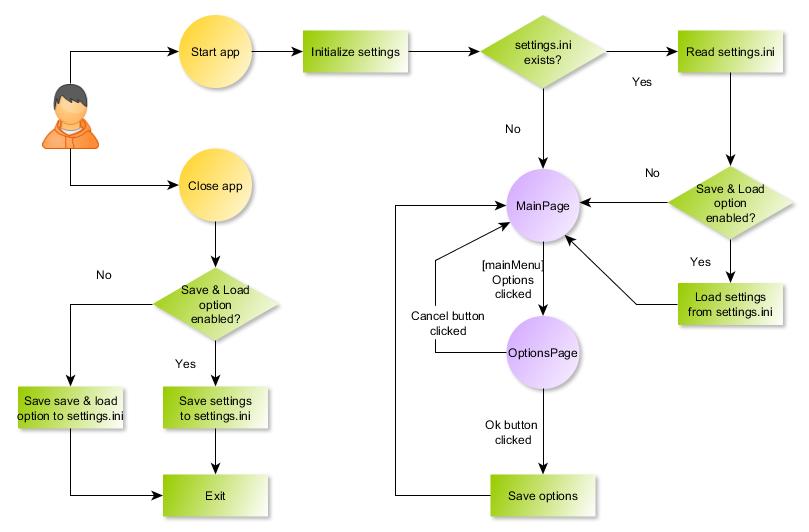
The HexTool program flow is shown below. When the application starts the UI settings are initialized. If the file settings.ini exists in the folder /home/user/.hextool and the “save & load” option is enabled the settings are read from the settings.ini file.
In the original Qt Widget based HexTool app there were two dialogs defined in the files hextool.ui and optionsdialog.ui. In the QML version I have replaced those with the QML pages MainPage and OptionsPage, respectively.
When the user closes the application the settings are saved back to the settings.ini file if the “save & load” option was set in the options page.
Porting the user interface
The user interface in the original HexTool seems to be developed with the Qt’s visual design tool Qt Designer. The tool is also available in Qt Creator (in Design mode). Each page (called a dialog) is created simply by picking UI elements from a toolbox and placing them into the page. The page definition is stored in a file with .ui extension (e.g. hextool.ui).
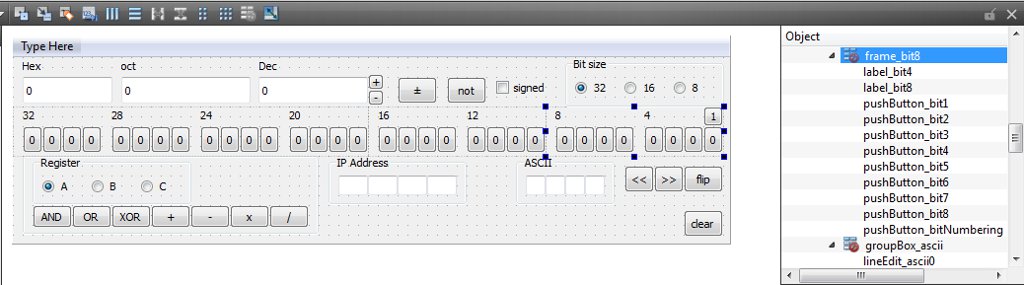
The hextool.ui dialog contains several different UI elements: QLabel, QLineEdit, QCheckBox, QPushButton. Basically you could code the UI manually without Qt Designer but often the job is easier with a visual tool.
In a typical work flow you will first run qmake to create a makefile and then run make. Qmake will recognize the ui files and add suitable commands to the makefile to process the ui files with the uic compiler. The uic compiler will then create a C++ header file with ‘ui_’ prefix for each ui file (e.g. ui_hextool.h). The header file contains declarations for all the UI elements. In addition, it defines a method setupUi, that can be called to create the UI during run-time.
To add some functionality to the user interface you will typically create a new class (e.g. class HexTool in files hextool.h and hextool.cpp). And then just include the ui header file and implement the needed signals and slots and other necessary functions.
To implement a similar kind of UI in QML we will first need to find suitable counterparts to the Qt widgets used in the hextool.ui. I have used the QML elements shown in the following table.
| Qt Widget | QML element |
| QLabel | Label |
| QLineEdit | TextField |
| QCheckBox | CheckBox |
| QPushButton | Button |
To design the UI with QML I chose the divide and conquer strategy. So instead of trying to cram all the elements into one page I created a set of smaller QML Item elements each defining one small part of the complete UI.
The division is illustrated below.
Then in the MainPage.qml file I just instantiated each item. The items are arranged with the anchors property.
import QtQuick 1.1
import com.nokia.meego 1.0

Page {

    ItemHeader {
        id: itemHeader
        headerText: "HexTool"
    }

    ItemNumberEntry {
        id: itemNumberEntry
        x: appDefaults.cDEFAULT_MARGIN
        anchors.top: itemHeader.bottom
    }

    ItemButtons {
        id: itemButtons
        anchors.top: itemHeader.bottom
        anchors.left: itemNumberEntry.right
    }

    ItemBinary {
        id: itemBinary
        x: appDefaults.cDEFAULT_MARGIN
        anchors.top: itemNumberEntry.bottom
    }

    ItemRegisters {
        id: itemRegisters
        x: appDefaults.cDEFAULT_MARGIN
        anchors.top: itemBinary.bottom
    }

    ItemFields {
        id: itemIPAddress
        itemWidth: 0.4
        fieldLabel: "IP Address"
        fieldColor: "#9a7d54"
        fieldType: 1
        anchors.left: itemRegisters.right
        anchors.top: itemBinary.bottom
    }

    ItemFields {
        id: itemUnicode
        itemWidth: 0.3
        fieldLabel: "Unicode"
        fieldColor: "#385838"
        fieldType: 2
        anchors.left: itemIPAddress.right
        anchors.top: itemBinary.bottom
    }

    ItemOperations {
        id: itemOperations
        x: appDefaults.cDEFAULT_MARGIN
        anchors.top: itemRegisters.bottom
    }
}
The MainPage will be instantiated in the main.qml file. The page orientation will be locked to landscape using the orientationLock property (note that the simulator needs to use the Automatic mode to work correctly).
    initialPage: mainPage
    MainPage {
        id: mainPage
        // Lock the screen orientation to landscape
        // (except for the simulator)
        orientationLock: (appDefaults.cSIMU_MODE)?
          PageOrientation.Automatic:PageOrientation.LockLandscape
    }
Register buttons
The ItemRegisters element has three QML Buttons labeled A, B and C. These buttons operate like checkable radiobuttons, i.e. only one button can be checked at a time. When a button is clicked the register contents will be displayed in the page. It is also possible to check the C register from the C++ side when an operation between the A and B registers is selected.

The buttons are positioned using the Repeater QML element. The register names are stored into the list regNames. The list is then assigned to the Repeater model property. Each button can then read the register name from the modelData context property. The index property gives access to the button index (0-2). When a button is clicked the onClicked event handler is called which emits two signals: the on_radiobutton_register_clicked(index) signal to inform the HexTool object and the local setChecked(index) signal to implement the radiobutton behaviour. The last Connections element captures the setReg(index) signal from the appWindow (defined in main.qml) and checks the chosen register.
import QtQuick 1.1
import com.nokia.meego 1.0

Item {
    width: 0.3*(appDefaults.cDISPLAY_WIDTH-2*appDefaults.cDEFAULT_MARGIN)
    height: appDefaults.cDISPLAY_HEIGHT/6

    property variant regNames : ["A","B","C"]
    property int spacingReg: 4
    property int widthReg: width/regNames.length-spacingReg
    property int heightReg: 40
    property int heightLbl: 40
    property int yReg: 30

    signal setChecked(int checkedIndex)

    Label {
        id: registerLabel
        height: heightLbl
        text: "Register"
    }

    Repeater {
        id: registers
        model: regNames
        Button {
            x: index*(widthReg+spacingReg)
            y: yReg
            checkable: true
            checked: false
            text: modelData
            width: widthReg
            height: heightReg
            onClicked: {
                // inform all radio buttons
                setChecked(index)
                // inform the C++ side
                on_radiobutton_register_clicked(index)
            }
            // Implement radio button like behaviour
            Connections {
                target: itemRegisters
                onSetChecked: checked = (index===checkedIndex)
            }
        }
    }

    Connections {
        target: appWindow
        onSetReg: setChecked(index)
    }
}
In main.qml we need to declare the signals.
    // Signals for ItemRegisters
    signal setReg(int index)
    signal on_radiobutton_register_clicked(int index)
To process the button clicks we need to connect the on_radiobutton_register_clicked(index) signal to a slot in the HexTool class. And to check a register we need to connect the setReg(index) signal to the corresponding signal in the QML side.
// Signals from ItemRegisters
connect(qml, SIGNAL(on_radiobutton_register_clicked(int)),
     this, SLOT(on_radiobutton_register_clicked(int)));
// Connect C++ signals to QML signals
connect(this, SIGNAL(setReg(int)), qml, SIGNAL(setReg(int)));
We need to declare the slot and the signal in the header file hextool.h.
private slots:
    void on_radiobutton_register_clicked(int);
signals:
    void setReg(int);
And implement the slot. Based on the provided index we can just call the original slot.
void HexTool::on_radiobutton_register_clicked(int index)
{
    switch(index)
    {
    case REG_A:
        on_radioButton_registerA_clicked();
        break;
    case REG_B:
        on_radioButton_registerB_clicked();
        break;
    case REG_C:
        on_radioButton_registerC_clicked();
        break;
    }
}
When an operation is selected that involves calculating register C value based on registers A and B the register C will be selected automatically to show the result. This is done in the function HandleOperation. Here the original code can check the button directly but we will emit a signal (setReg) instead.
int HexTool::HandleOperation
(
    eOpType op
)
{
    // Perform the operation on the registers
    int retVal = RegisterOperation(REG_A, REG_B, REG_C, op);

    // change the display to show register C
    SetRegister(REG_C);
    //ui->radioButton_registerC->setChecked(true);
    emit(setReg(REG_C));

    // Update the display
    UpdateDisplay();

    return (retVal);
}
Operations buttons
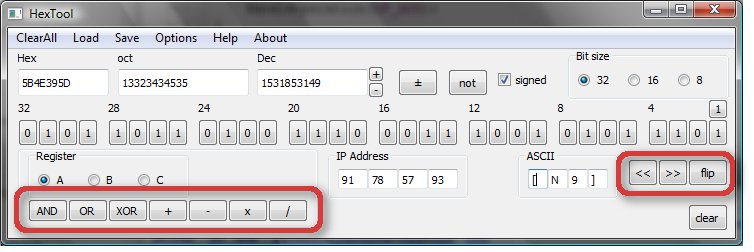
The ItemOperations component is another example where the Repeater QML element proved to be useful. The component places 10 buttons (shown in the original UI below) into one row in the N9 hextool.
In the Qt widget based application each button will emit the signal pressed() when clicked. The setupUi will automatically connect the pressed() signal to a slot that follows the naming convention on_objectName_signalName(). The HexTool class has slots: ‘on_pushButton_<op>_pressed()’ where <op> is one of: AND, OR, XOR, plus, minus, multiply, divide, shiftLeft, shiftRight, endianSwap (pushButton_<op> being the object name). Thus those slots will be automatically connected, which is a nice feature.
To avoid creating a lot of signals and connect statements I decided to use one Repeater element and one signal: on_pushButton_regop_pressed(index) passing the button index as a parameter. Thus instead of creating 10 slots I could handle the buttons with one slot.
![]()
Here is the QML file to instantiate the 10 buttons.
import QtQuick 1.1
import com.nokia.meego 1.0

Item {
    width: appDefaults.cDISPLAY_WIDTH-2*appDefaults.cDEFAULT_MARGIN
    height: appDefaults.cDISPLAY_HEIGHT/10

    property int spacingBtn: 4
    property variant ops : ["AND","OR","XOR","+","-","x","/","<<",">>","flip"]
    property int nButtons : ops.length
    property int widthBtn: (width-(nButtons-1)*spacingBtn)/nButtons

    Repeater {
        model: ops
        Button {
            x: index*(widthBtn+spacingBtn)
            text: modelData
            width: widthBtn
            height: appDefaults.cBUTTON_HEIGHT
            onClicked: on_pushButton_regop_pressed(index)
        }
    }
}
The button labels in the ops list are passed to the Repeater using the model property. Each Button can then retrieve the label text from the modelData property. The Repeater index is used to position the buttons and passed on to the C++ side via the on_pushButton_regop_pressed signal. The signal should be declared in the main.qml file and in the hextool.h header and then connected in the hextool.cpp.
The on_pushButton_regop_pressed slot just calls the operation handler.
void HexTool::on_pushButton_regop_pressed(int index)
{
    enum BtnName {BTN_AND=0,BTN_OR,BTN_XOR,BTN_PLUS,BTN_MINUS,BTN_MULT,
                 BTN_DIV,BTN_LSHIFT,BTN_RSHIFT,BTN_FLIP};

    switch(index) {
    case BTN_AND:
        HandleOperation(OP_AND);
        break;
    case BTN_OR:
        HandleOperation(OP_OR);
        break;
    case BTN_XOR:
        HandleOperation(OP_XOR);
        break;
    case BTN_PLUS:
        HandleOperation(OP_ADD);
        break;
    case BTN_MINUS:
        HandleOperation(OP_SUBTRACT);
        break;
    case BTN_MULT:
        HandleOperation(OP_MULTIPLY);
        break;
    case BTN_DIV:
        HandleOperation(OP_DIVIDE);
        break;
    case BTN_LSHIFT:
        RegisterOperation(REG_CURRENT, REG_CURRENT, REG_CURRENT, OP_LEFT_SHIFT);
        UpdateDisplay();
        break;
    case BTN_RSHIFT:
        RegisterOperation(REG_CURRENT, REG_CURRENT, REG_CURRENT, OP_RIGHT_SHIFT);
        UpdateDisplay();
        break;
    case BTN_FLIP:
        on_pushButton_endianSwap_pressed();
        break;
    };
}
Bit buttons
There are 32 bit buttons that can be used to toggle individual bits. Again creating the buttons with the Repeater was an obvious choise. In this case the Repeater model property is simply set to 32 to repeat the Button element 32 times. Each bit button has an event handler onClicked that emits the signal groupButton_clicked, passing the bit number (1-32, 1=LSB) to the C++ side.

Another Repeater is used to attach the bit position number to every 4th button. One additional button is added to make it possible to change to start value for the bit numbers. When clicked the button will emit the signal on_pushButton_bitNumbering_pressed(zeroBased).
There are 3 signals coming from the C++ side that need to be processed:
- onSetBit to set a bit value.
- onSetBitGroup16Enabled to enable or disable bits 9-16.
- onSetBitGroup32Enabled to enable or disable bits 17-32.
The Connections element is used to connect a top-level signal (declared in main.qml) to a local event handler.
import QtQuick 1.1
import com.nokia.meego 1.0

Item {
    width: appDefaults.cDISPLAY_WIDTH-2*appDefaults.cDEFAULT_MARGIN
    height: appDefaults.cDISPLAY_HEIGHT/3.2

    property int widthBtn: (width-12*spacingBtn-3*spacingGrp)/16
    property int heightBtn: 40
    property int spacingBtn: 4
    property int spacingGrp: 20
    property int spacingRow: 70
    property int offsetBtnRow: 35
    property int widthLbl: 4*(widthBtn+spacingBtn)+spacingGrp

    property bool zeroBased: optzerobased
    property bool enable32: true
    property bool enable16: true

    // Bits
    Repeater {
        id: bitFields
        model: 32
        Button {
            property int iRow: Math.floor(index/16)
            property int iGroup: Math.floor(index/4)
            property bool isEnabled: (index<16)?enable32:(index<24)?enable16:true x: (index-iRow*16)*(widthBtn+spacingBtn)+spacingGrp*(iGroup-(iGroup>3)*4)
            y: offsetBtnRow+iRow*spacingRow
            text: "0"
            width: widthBtn
            height: heightBtn
            enabled: isEnabled
            onClicked: groupButton_clicked(32-index)     // bit number, LSB=1
        }
    }

    // Bit position numbers
    Repeater {
        model: 8
        Label {
            property int bitIndex: 31-index*4
            property int iRow: Math.floor(index/4)
            x: (index-iRow*4)*widthLbl
            y: iRow*spacingRow
            text: (zeroBased)?bitIndex:bitIndex+1
            width: widthLbl
        }
    }

    // Button to toggle the start value for the bit index: 0/1
    Button {
        x: 15*(widthBtn+spacingBtn)+3*spacingGrp
        y: spacingRow
        text: (zeroBased)?0:1
        width: widthBtn;height:heightBtn
        onClicked: {
            zeroBased = !zeroBased
            on_pushButton_bitNumbering_pressed(zeroBased)
        }
    }

    Connections {
        target: appWindow
        onSetBit: bitFields.itemAt(31-index).text = value
    }

    Connections {
        target: appWindow
        onSetBitGroup16Enabled: {
            enable16 = isEnabled
        }
    }

    Connections {
        target: appWindow
        onSetBitGroup32Enabled: {
            enable32 = isEnabled
        }
    }
}
In the Qt Widget based application all the widget properties can be set directly from the C++ code. In our QML based application we will use signals and QML event handlers instead. E.g. the setBit signal and the onSetBit event handler are used to set the bit values from the UpdateDisplay method.
    int bitVal;

    for (int bit=0; bit<8; bit++)
    {
        bitVal = (value & (1<<bit))?1:0; sprintf(str, "%d", bitVal);
        //ui->buttonGroup->button(bit+1)->setText(str);
        emit(setBit(bit,str));
    }
Number entry
Numbers can be entered in decimal, hexadecimal or in octal format. There is one Textfield element for each number type. In addition there are three buttons: the “neg” button will negate the value (if signed mode is selected). The “+” and “-” buttons will increase and decrease the value by one.

The file itemNumberEntry.qml is shown below. The Repeater element is used to place the TextFields and the Labels. The number entry is controlled by methods in the C++ side.
import QtQuick 1.1
import com.nokia.meego 1.0

Item {
    width: 0.65*(appDefaults.cDISPLAY_WIDTH-2*appDefaults.cDEFAULT_MARGIN)
    height: 0.22*appDefaults.cDISPLAY_HEIGHT

    property int spacingField : 5
    // width for plus and minus buttons
    property int widthPlusMinus : 40
    // text field widths
    property variant fieldWidths : [140,175,170]
    property int nFields : fieldWidths.length
    property variant maxEntryLength : [8,11,11]
    property int yField : 0.45*height
    // for the "neg" button
    property int widthBtn: 70
    property int heightBtn: 40

    Repeater {
        id: entryFields
        model: nFields
        TextField {
            property int rightEdge : x+fieldWidths[index]+spacingField
            width: fieldWidths[index]
            x: (index>0)?entryFields.itemAt(index-1).rightEdge:0
            y: yField
            maximumLength: maxEntryLength[index]
            onTextChanged: {
                entryTextChanged(index,text)
            }
            // close the keyboard
            Keys.onReturnPressed: {
                parent.focus = true;
            }
        }
    }

    // Labels for the text fields
    Repeater {
        id: entryLabels
        model: ["hex","oct","dec"]
        Label {
            property int rightEdge : x+fieldWidths[index]+spacingField
            x: (index>0)?entryLabels.itemAt(index-1).rightEdge:0
            y: yField-height
            text: modelData
            width: fieldWidths[index]
        }
    }

    Button{
        text: "neg"
        anchors.right: plusMinus.left
        y: yField-height
        width: widthBtn; height: heightBtn
        onClicked: on_pushButton_neg_clicked()
    }


    Column {
        id: plusMinus
        anchors.right: parent.right
        anchors.bottom: parent.bottom
        Item {
            height: 20
            width: widthPlusMinus
        }
        Button {
            text: "+"
            width: widthPlusMinus
            height: widthPlusMinus
            onClicked: on_pushButton_increase_clicked()
        }
        Button {
            text: "-"
            width: widthPlusMinus
            height: widthPlusMinus
            onClicked: on_pushButton_decrease_clicked()
        }
    }

    Connections {
        target: appWindow
        onSetText: entryFields.itemAt(index).text = value
    }
}
When one of the TextField elements is clicked the on-screen keyboard will pop-up. When a key is pressed the textChanged signal is emitted. The event handler onTextChanged will emit the signal entryTextChanged and pass the textfield number (0-2) and the entered character string to the C++ side to the slot entryTextChanged. Based on the textfield index number the string will be passed to the correct handler method.
void HexTool::entryTextChanged(int index, QString strValue)
{
    switch(index) {
    case 0:     // hex
        on_lineEdit_hex_textChanged(strValue);
        break;
    case 1:     // oct
        on_lineEdit_oct_textChanged(strValue);
        break;
    case 2:     // dec
        on_lineEdit_dec_textChanged(strValue);
        break;
    }
}
The handler method will validate the entered character string in a very simple manner. The string will be converted to an unsigned integer by calling the QString.toUInt() method, which will return 0 if the conversion fails. To enter negative decimal numbers the “neg” button can be used.
Here is the octal number handler method.
void HexTool::on_lineEdit_oct_textChanged(QString strValue)
{
    int value;
    value = (int)strValue.toUInt(0,8);
    SetValue(value, REG_CURRENT);
    UpdateDisplay();
}
The UpdateDisplay() method will update the textfield contents. Here we need to replace the Qwidget direct access with a signal setText. The signal will be connected to the QML event handler onSetText (shown above) which will close the loop; the TextField elements will show the updated number (or zero if the conversion failed).
    //ui->lineEdit_dec->setText(str);
    emit(setText(DEC,str));
    sprintf(str, "%X", value);
    //ui->lineEdit_hex->setText(str);
    emit(setText(HEX,str));
    sprintf(str, "%o", value);
    //ui->lineEdit_oct->setText(str);
    emit(setText(OCT,str));
IP address and unicode entry
These entry fields operate basically in the same way as the main number fields described above. The main difference is that the entry fields will be placed in the page header. This is because the on-screen keyboard will hide the IP Address and Unicode displays.

So when either the IP Address or Unicode display is clicked the entry fields in the header area will be enabled and made visible. Also the “Help” button will change to “Close” button for closing the entry (the entry fields can be closed also by clicking again the IP Address/Unicode displays).
![]()
As these two displays are operated in a similar manner I decided to create one reusable item and parameterize it so that it can be used for both displays.
The ItemFields.qml file is shown below. A set of properties are used as a simple API to customize the item at instantiation time (see MainPage.qml above). The setField signal will pass the field type (1,2) to the signal handler (onSetField) so that we know which display type we are handling.
import QtQuick 1.1
import com.nokia.meego 1.0

Item {

    // API
    property real itemWidth
    property alias fieldLabel: fieldLabel.text
    property string fieldColor
    property int fieldType

    // Dimensions
    width: itemWidth*(appDefaults.cDISPLAY_WIDTH-2*appDefaults.cDEFAULT_MARGIN)
    height: appDefaults.cDISPLAY_HEIGHT/6

    property int nFields: 4
    property int spacing: 4

    property int widthField: (width-(nFields-1)*spacing)/nFields
    property int heightField: 40
    property int heightLabel: 40

    property int yField: 30

    Label {
        id: fieldLabel
        height: heightLabel
    }

    Repeater {
        id: fields
        model: nFields
        Rectangle {
            property alias text: textLabel.text
            x: index*(widthField+spacing)
            y: yField
            width: widthField
            height: heightField
            Label {
                id: textLabel
                anchors.centerIn: parent
            }
            gradient: Gradient {
                GradientStop { position: 0.0; color: "black" }
                GradientStop { position: 0.5; color: fieldColor }
                GradientStop { position: 1.0; color: "black" }
            }
        }
    }

    // signal handler for setField(int type, int index, string value)
    Connections {
        target: appWindow
        onSetField:
            if(type===fieldType)
                fields.itemAt(index).text = value
    }

    MouseArea {
        anchors.fill: parent
        onClicked: {
            showHeaderEntry(fieldType)
        }
    }
}
Header entry fields
When the user clicks on the IP Address or the Unicode display the TextField elements in the ItemHeader are enabled. The signal showHeaderEntry from ItemFields will pass the field type to the ItemHeaderEntry (via the mode parameter of the setHeaderEntryVisible signal).
The ItemHeaderEntry may receive 5 different signals from the C++ side:
- setHeaderEntry – to set contents to one of the four text fields.
- setHeaderEntryFocus – to select all the characters in one text field (to make it faster to enter new data).
- setHeaderEntryVisible – to make the text fields visible.
- btnCloseClicked – to make the text fields invisible.
- setHeaderEntryEnabled – to control the visibility of one text field (needed when 8 or 16 bit mode is selected).
The TextField element will emit the signal textChanged when a new character is entered. Note that inputMethodHints property must be set to Qt.ImhNoPredictiveText, otherwise the textChanged signal does not emit correctly. The onTextChanged event handler will emit the signal on_lineEdit_textChanged and pass the mode (IP Address=1/Unicode=2), the field index (0-3) and the current TextField text to the C++ side.
import QtQuick 1.1
import com.nokia.meego 1.0

Item {

    width: 0.4*(appDefaults.cDISPLAY_WIDTH-2*appDefaults.cDEFAULT_MARGIN)
    height: heightField

    property int nFields: 4
    property int spacingField: 4
    property int widthField: (width-(nFields-1)*spacingField)/nFields
    property int heightField: 40

    property int heightLbl: 40
    property int yField: 30

    property int mode: 0
    property int modeMaxLength: 3

    Repeater {
        id: fields
        model: nFields
        TextField {
            width: widthField
            height: heightField
            x: index*(widthField+spacingField)
            // This is required for textChanged signal
            inputMethodHints: Qt.ImhNoPredictiveText;
            onTextChanged: {
                on_lineEdit_textChanged(mode,index,text)
            }
            // close the keyboard
            Keys.onReturnPressed: {
                parent.focus = true;
            }
            onVisibleChanged: {
                maximumLength = modeMaxLength
            }
        }
    }

    // signal handler for setHeaderEntry(int index, string value)
    Connections {
        target: appWindow
        onSetHeaderEntry: {
            fields.itemAt(index).text = value
        }
    }

    // signal handler for setHeaderEntryFocus(int index)
    Connections {
        target: appWindow
        onSetHeaderEntryFocus: {
            fields.itemAt(index).focus = true
            fields.itemAt(index).selectAll()
        }
    }

    // signal handler for setHeaderEntryVisible(int mode)
    Connections {
        target: appWindow
        onSetHeaderEntryVisible: {
            itemHeaderEntry.modeMaxLength = (mode===1)?3:1
            itemHeaderEntry.visible = true
            itemHeaderEntry.mode = mode
            btnHelp.mode = mode
        }
    }

    // Close button in ItemHeader was clicked - end entry
    Connections {
        target: appWindow
        onBtnCloseClicked: {
            // reset maxLength to 3, otherwise we cannot change
            // content from chars to IP address
            itemHeaderEntry.modeMaxLength = 3
            itemHeaderEntry.visible = false
            mode = 0
            btnHelp.mode = 0
            parent.focus = true;
        }
    }

    // signal handler for setHeaderEntryEnabled(int index, bool isEnabled)
    Connections {
        target: appWindow
        onSetHeaderEntryEnabled: {
            fields.itemAt(index).enabled = isEnabled
            fields.itemAt(index).visible = isEnabled
        }
    }
}
The remaining buttons
The ItemButtons item contains the rest of the buttons.
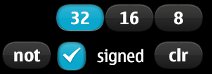
The buttons labeled 32,16,8 can be used to select the number of bits available. The “not” button will invert all the bits in the current register. The “clr” button will clear the current register. And the “signed” checkbox can be checked to allow entering negative decimal numbers (with the “neg” button).
The buttons are organized into two rows using the Row element. The buttons 32, 16 and 8 operate like radiobuttons (like the register buttons), so only one button can be checked at a time.
import QtQuick 1.1
import com.nokia.meego 1.0

Item {

    width: 0.35*(appDefaults.cDISPLAY_WIDTH-2*appDefaults.cDEFAULT_MARGIN)
    height: 0.22*appDefaults.cDISPLAY_HEIGHT

    property int widthBtn: 70
    property int heightBtn: 40
    property int spacingBtn: 4

    signal setChecked(int checkedIndex)

    Row {
        id: upperRow
        y: 0.1*parent.height
        anchors.right: parent.right

        Repeater {
            id: radioButtons
            model: ["32","16","8"]
            Button {
                checkable: true
                checked: false
                text: modelData
                width: widthBtn
                height: heightBtn
                onClicked: {
                    // inform all radio buttons
                    setChecked(index)
                    // inform the C++ side
                    on_radioButton_bitsize_clicked(index)
                }
                // Implement radio button like behaviour
                Connections {
                    target: itemButtons
                    onSetChecked: checked = (index===checkedIndex)
                }
            }
        }
    }

    // Handle signal from the C++ side
    Connections {
        target: appWindow
        onSetBitSize: setChecked(index)
    }

    Row {
        id: lowerRow
        anchors.bottom: parent.bottom
        anchors.right: parent.right
        spacing: 2*spacingBtn
        Button{
            text: "not"
            width: widthBtn; height: heightBtn
            onClicked: on_pushButton_not_pressed()
        }
        CheckBox {
            id: signed
            text: "signed "
            onCheckedChanged: on_checkBox_signed_toggled(checked)
        }
        Button{
            text: "clr"
            width: widthBtn; height: heightBtn
            onClicked: on_pushButton_clr_clicked()
        }
    }

    Connections {
        target: appWindow
        onSetSigned: signed.checked = isChecked
    }

    Annotation {
        label: "ItemButtons"
    }
}
Porting the menu bar
In the original HexTool there is a menu bar that contains a set of action items.
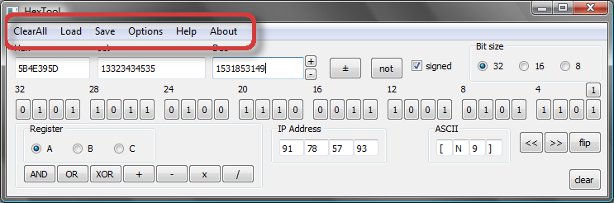
The menu is defined in hextool.cpp in the HexTool class constructor. The menu items are first defined as QAction objects and then the objects are added to the menuBar by calling the menuBar addAction method. The menuBar is a member of the HexTool class (which is derived from QMainWindow). Finally the QAction triggered signals are connected to HexTool class slots.
    /********setting the menu********************************/
    QAction *clear = new QAction("ClearAll",this);
    QAction *about = new QAction("About",this);
    QAction *save = new QAction("Save",this);
    QAction *load = new QAction("Load",this);
    QAction *help = new QAction("Help",this);
    QAction *opt = new QAction("Options",this);
    this->menuBar()->addAction(clear);
    this->menuBar()->addAction(load);
    this->menuBar()->addAction(save);
    this->menuBar()->addAction(opt);
    this->menuBar()->addAction(help);
    this->menuBar()->addAction(about);
    connect(clear, SIGNAL(triggered()), this, SLOT(clearAll()));
    connect(about, SIGNAL(triggered()), this, SLOT(about()));
    connect(save, SIGNAL(triggered()), this, SLOT(save_ini()));
    connect(load, SIGNAL(triggered()), this, SLOT(load_ini()));
    connect(help, SIGNAL(triggered()), this, SLOT(help()));
    connect(opt, SIGNAL(triggered()), this, SLOT(optDialog()));
In QML a similar kind of menu structure can be created with the following code (in MainMenu.qml).
import QtQuick 1.1
import com.nokia.meego 1.0

Menu {

    MenuLayout {

        MenuItem {
            text: qsTr("ClearAll")
            onClicked: {
                menuClearClicked()
            }
        }
        MenuItem {
            text: qsTr("Load")
            onClicked: {
                menuLoadClicked()
            }
        }
        MenuItem {
            text: qsTr("Save")
            onClicked: {
                menuSaveClicked()
            }
        }
        MenuItem {
            text: qsTr("Options")
            onClicked: {
                menuOptionsClicked()
            }
        }
        MenuItem {
            text: qsTr("About")
            onClicked: {
                menuAboutClicked()
            }
        }
    }
}
This creates a basic pull-down menu that can be opened from the page header. I moved the Help action to a separate button (also located in the page header) because of the limited space available for the menu items (5 items is the maximum that can easily fit to the pull-down menu when the application is running in the landscape mode).

In addition we need to connect the menu clicked signals, e.g. menuAboutClicked to the QML event handlers and to the C++ slots. In the main.qml file we will declare the signals and add an event handler for those signals that do not require processing in the C++ side, e.g. for the About page. To show dialog pages and to push new pages to the pagestack we can use the Loader QML element (thus we don’t need to spend extra CPU cycles for creating those pages when the application is started).
 // Signals for MainMenu
 signal menuClearClicked()
 signal menuLoadClicked()
 signal menuSaveClicked()
 signal menuOptionsClicked()
 signal menuAboutClicked()
...
 // QML component loader
 Loader {
    id: myLoader
 }
...
// Menu>About was clicked
 onMenuAboutClicked: {
    myLoader.source = "DialogAbout.qml"
    myLoader.item.show()
 }
 // Menu>Options was clicked, open options page
 // and pass in the current options
 onMenuOptionsClicked: {
    pageStack.push(Qt.resolvedUrl("OptionsPage.qml"),
       {saveload:optsl,signext:optsignext});
 }
 onBtnHelpClicked: {
    myLoader.source = "DialogHelp.qml"
    myLoader.item.show()
 }
In the HexTool class constructor we can then connect the remaining signals to slots.
#include "hextool.h"

HexTool::HexTool(QObject *qml, QObject *parent) :
    QObject(parent)
{
...
 // connect QML signals to HexTool slots
 connect(qml, SIGNAL(menuClearClicked()),
    this, SLOT(clearAll()));
 connect(qml, SIGNAL(menuLoadClicked()),
    this, SLOT(load_ini()));
 connect(qml, SIGNAL(menuSaveClicked()),
    this, SLOT(save_ini()));
...
This requires that we have passed to the constructor a pointer to the QML root object when instantiating the HexTool class in the main.cpp file.
#include <QDeclarativeItem>
#include "hextool.h"
...

// get the QML root object for signal-slot connections
QObject *qml = viewer.rootObject();

// Create the back-end processor and pass in the root object.
// Make viewer the parent object.
hextool = new HexTool(qml, &viewer);
Summary
In a Qt Widget based application all the UI elements are created directly from the C++ code (e.g. via the setupUi function) and a pointer is available to access the properties. In the QML based user interface the elements are defined in the QML files. We can control the properties by signals emitted from the C++ side and processed by QML event handlers. The property values can be passed as signal parameters.
Passing information from the UI to the C++ side works basically in the same way in the Qt Widget based and in the QML based application. The UI components emit signals that are then received and processed by the slots defined in the C++ side.
Querying property values from Qt Widgets is also easily accomplished via the available pointers. Reading QML element properties is not so straightforward. In principle it could be done using pointers but the code examples that I have seen look pretty ugly. I think a better alternative is to just keep track of the QML element states in the C++ side and update the states whenever the properties are updated.
To port menu items:
- Replace the menuBar with the Menu & MenuLayout QML elements.
- For each QAction create a MenuItem.
- Replace the QAction triggered() signal with a corresponding QML signal declared in the main.qml file.
- Either create a QML event handler to process the signal or connect the signal to a slot defined in a C++ class. Pass a pointer to the QML root object to the class constructor for the signal/slot connections.
Getting the source code
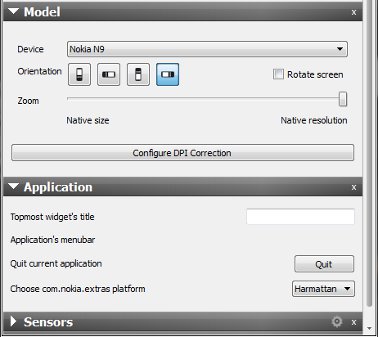
The source code for the N9 HexTool is available at GitHub: https://github.com/n9dyfi/HexTool. If you have the Qt Creator 2.4.1 and the Nokia Qt SDK installed you can open the project directly from GitHub and run it in the N9 simulator. Just make sure that the Rotate screen option is unchecked and that the com.nokia.extras platform is set to Harmattan.
Pingback: Tab the page with a repeater – n9.dy.fi